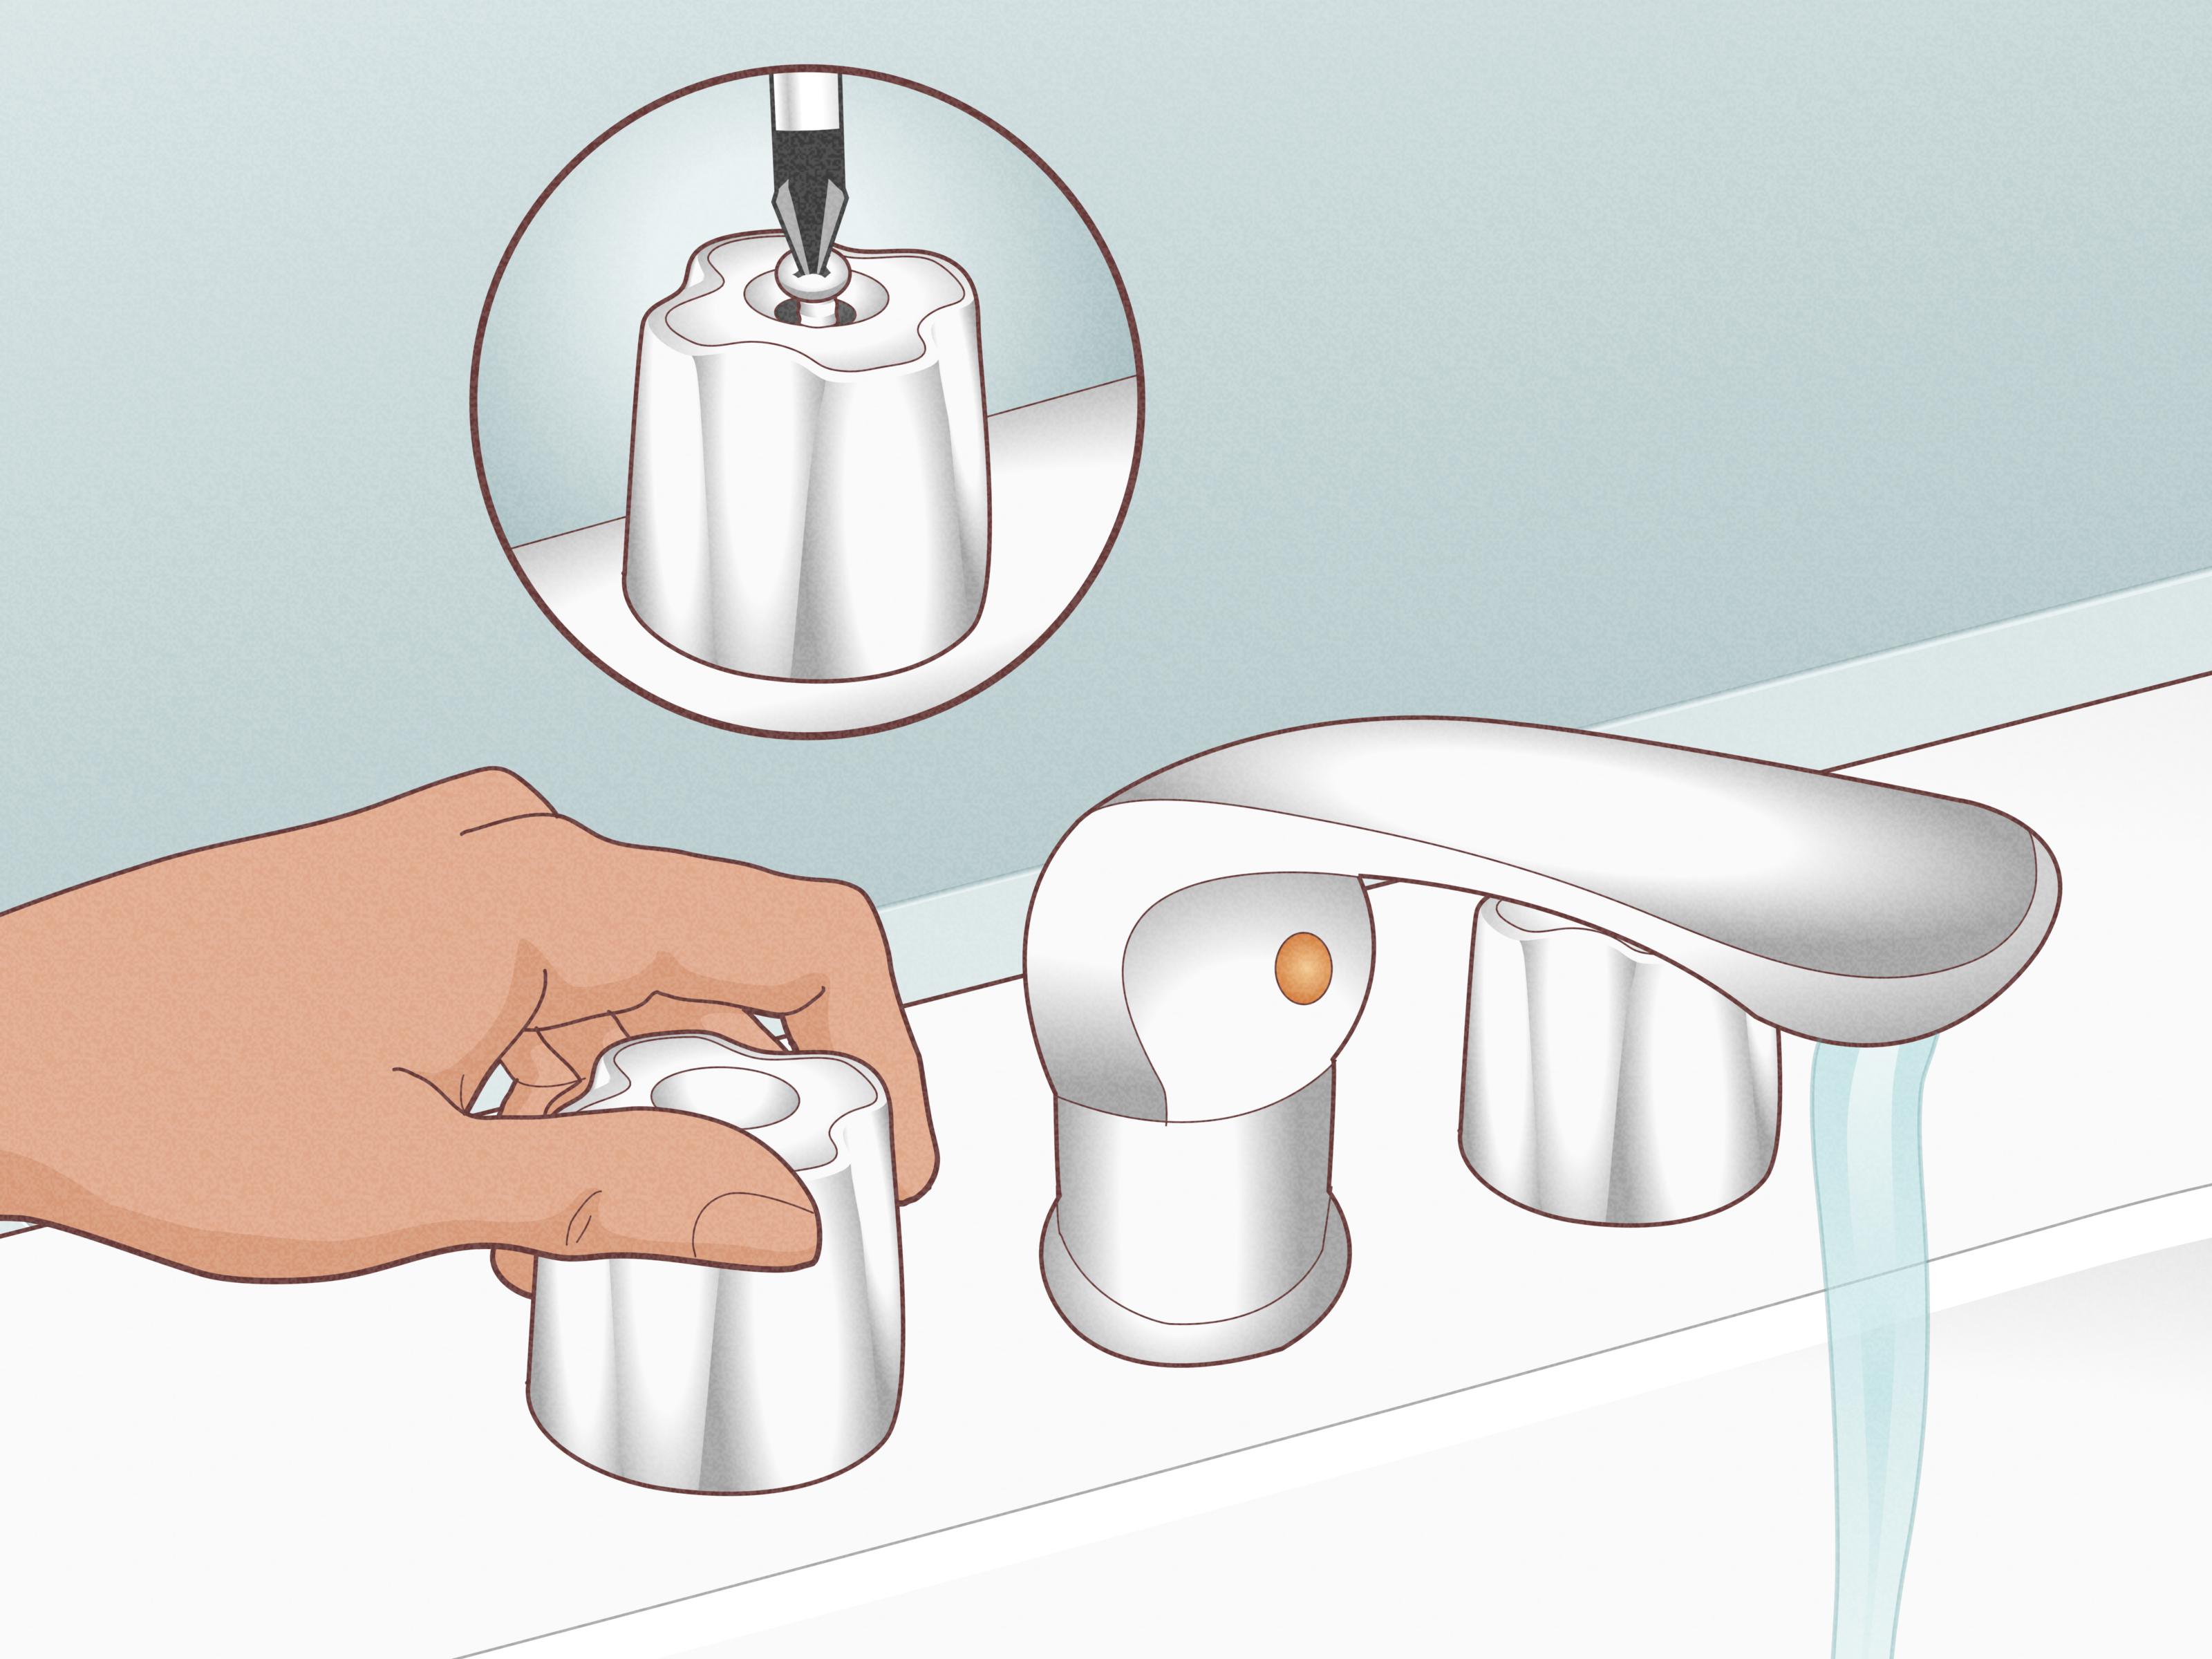
A dripping tap can drive you crazy, but learning how to fix a leaking faucet without a plumber is one of the most empowering, money-saving DIY skills you can acquire. According to the United States Environmental Protection Agency, an average home leak can waste thousands of gallons of water annually, directly inflating your water bill. Fortunately, most household faucet drips are caused by worn-out rubber washers, damaged O-rings, or corroded cartridges, all of which can be replaced with minimal effort and basic hand tools.
When to Use These Faucet Repair "Recipes"
Before pulling out your wrench, you need to understand when a DIY solution is safe and when you are crossing into territory that requires professional intervention. DIY plumbing is ideal for surface-level leaks, handle drips, and worn-out internal parts that can be easily unscrewed. However, if your pipes are vibrating violently, if water is actively spraying behind your drywall, or if you suspect your entire shut-off valve is broken, it is time to call in the professionals.
1. The Classic Compression Faucet Repair Recipe
Goal: Stop the dripping from an older, dual-handle faucet where rubber seals have deteriorated over years of friction.
Ingredients & Tools:
- Flathead and Phillips screwdrivers
- Adjustable crescent wrench
- Replacement rubber washers (variety pack)
- Plumber's grease (silicone-based)
- Utility knife or small pick
Step-by-Step Instructions:
- Turn off the water supply valves under the sink by turning them clockwise until tight.
- Turn on the faucet to drain any remaining water in the pipes.
- Pry off the decorative hot/cold index caps on the handles using a small flathead screwdriver.
- Unscrew the handle screw and pull the handle straight up and off the stem.
- Use your adjustable wrench to unscrew the packing nut on the stem.
- Twist the stem to unscrew it from the faucet body and lift it out.
- Remove the small screw holding the rubber washer at the bottom of the stem, replace the washer, apply a tiny smear of plumber's grease, and reassemble.
Adjusting Compression Faucet Seat Integrity
- If the leak persists after changing the washer, check the metal valve seat deep inside the faucet body.
- Use a valve seat grinding tool to smooth out mineral build-up and nicks.
- Alternatively, replace the brass seat entirely using an Allen wrench.
Failure Modes:
- Overtightening the packing nut can crush the new washer, making the handle hard to turn and causing immediate leaks.
- Stripping the delicate brass stem threads by cross-threading during reinstallation.
2. The Ball Faucet Leak Fix Recipe
Goal: Stop leaks on single-handle kitchen faucets that rely on a slotted rotating metal ball to mix hot and cold water.
Ingredients & Tools:
- Hex key (Allen wrench)
- Slip-joint pliers
- Replacement ball faucet rebuild kit (includes springs, rubber seats, and O-rings)
- Small tweezers
Step-by-Step Instructions:
- Shut off the hot and cold water valves completely beneath the cabinet.
- Loosen the small set screw on the front of the handle with an Allen wrench, then lift the handle off.
- Wrap protective tape around the cap nut to avoid scratches, then unscrew it using slip-joint pliers.
- Pull out the plastic cam, cam washer, and the metal ball itself.
- Using tweezers, reach inside the faucet body to lift out the two rubber seats and small springs underneath them.
- Insert the new springs first, then drop in the new rubber seats over them.
- Align the tab on the metal ball with the groove inside the faucet, drop the ball back in, and replace the plastic cam and cap.
Variations for Plastic Balls vs. Metal Balls
- Many older models use plastic balls, which are prone to cracking and scale accumulation.
- Upgrade to a stainless steel ball assembly for superior wear resistance and smoother operation.
Failure Modes:
- Putting the tiny springs in upside down can block the rubber seats, leading to low water pressure.
- Forgetting to align the pin on the faucet housing with the slot in the ball will restrict the handle's movement.
3. The Cartridge Faucet Drip-Stop Recipe
Goal: Swap out a failing internal plastic or brass cartridge causing drips from either the spout or the base of the handle.
Ingredients & Tools:
- Allen wrench
- Needle-nose pliers
- Cartridge puller tool (highly recommended for stubborn stems)
- Replacement cartridge matching your faucet model
Step-by-Step Instructions:
- Isolate the water supply and drain any residual pressure from the lines.
- Remove the handle screw cap and unscrew the handle to expose the retaining nut.
- Unscrew the retaining nut or remove the brass retaining clip using needle-nose pliers.
- Attach your cartridge puller tool to the top of the cartridge, twist gently, and pull straight up.
- Note the exact orientation of the old cartridge before discarding it.
- Slide the new replacement cartridge down into the faucet body, ensuring the alignment notches match perfectly.
- Reinstall the retaining clip, screw back the retaining nut, and attach the handle.
Brass vs. Plastic Cartridges
- Brass cartridges are highly durable but can become seized over time due to calcification.
- Plastic cartridges do not corrode but can crack under sudden thermal shocks.
Failure Modes:
- Forgetting to install the retaining clip will cause water pressure to blow the cartridge straight out of the faucet.
- Installing the cartridge 180 degrees backward will reverse your hot and cold water handle positions.
4. The Ceramic Disk Faucet Restoration Recipe
Goal: Clean or replace the highly precise ceramic disks inside modern single-handle faucets to eliminate slow dripping.
Ingredients & Tools:
- Screwdriver
- Channel lock pliers
- White vinegar
- Soft-bristled toothbrush
- Replacement O-rings
Step-by-Step Instructions:
- Shut off the under-sink water valves and open the faucet handle to bleed the system.
- Remove the handle cap, unscrew the handle, and lift it away.
- Unscrew the decorative metal escutcheon collar.
- Remove the cartridge mounting screws to release the ceramic disk cylinder.
- Pull out the cylinder and inspect the small rubber seals on the underside.
- Soak the entire cylinder in white vinegar for 30 minutes to dissolve mineral crust.
- If the ceramic disks inside are cracked or broken, replace the entire disk cartridge assembly.
Simply Cleaning the Ceramic Disks
- Often, the ceramic disks themselves are in perfect condition, but trapped sediment breaks the seal.
- Gently clean the disks with a soft toothbrush dipped in vinegar to restore their mirror-smooth mating surface.
Failure Modes:
- Dropping the ceramic cylinder on a hard floor can chip the fragile internal disks, rendering them useless.
- Overtightening the cylinder mounting screws can warp the seals, causing immediate leaks underneath the sink.
Diagnostic Matrix for Faucet Fixes
Using the correct fix depends on pinpointing exactly where the leak originates. The table below outlines common symptoms, potential root causes, and recommended parts to buy before starting your repairs.
| Leak Symptom | Most Likely Root Cause | Required Replacement Part | Difficulty Level |
|---|---|---|---|
| Water dripping from the end of the spout | Worn washer, cartridge, or ceramic disk | O-ring, washer, or complete cartridge rebuild kit | Easy to Moderate |
| Water leaking from around the base of the handle | Damaged packing washer or stem O-ring | Stem O-rings, plumber's tape, or thread sealant | Easy |
| Water leaking under the sink cabinet | Loose supply line connection or cracked body | Flexible braided supply lines or new faucet assembly | Moderate |
| Spray wand dripping or sputtering | Clogged aerator or failing diverter valve | Replacement aerator or clean diverter in vinegar | Very Easy |
How to Customize Your Repair Process
Not every plumbing fixture is identical. You can adjust these repair recipes to match your home's unique hardware setup and aesthetic requirements.
- Determine your finish: Always use a rag or painter's tape between your metal tools and finished plumbing fixtures to protect brass, matte black, or oil-rubbed bronze from permanent scratches.
- Assess water hardness: If your home has hard water, buy some extra vinegar to soak all metal parts while they are disassembled.
- Check your supply line age: While working under the sink, look at your flexible supply hoses. If they are older than five years, consider swapping them out for new braided stainless steel lines while you already have the water shut off.
- Upgrade your aerator: Use this teardown opportunity to install a modern, water-saving aerator to reduce overall utility costs.
Identifying Your Faucet Type Before Starting
Before buying replacement parts, you must know what kind of valve mechanism is hiding under the metal shell. If you don't have the original instruction manual, look at the handles. A faucet with two separate handles (one hot, one cold) is almost always a compression faucet or a two-handle cartridge design. A single-handle faucet that pivots and rotates is either a ball faucet, a cartridge model, or a ceramic disk design. When in doubt, take the old parts with you to the local hardware store to match the exact size and model.
Essential Safety Measures and Prep Steps
Plumbing mistakes can quickly turn expensive if you flood your bathroom or kitchen. Follow these basic safety precautions to ensure a dry, stress-free repair project:
- Always shut off the local water valves underneath the sink cabinet. If those valves are old and won't budge, shut off the main water valve to the entire house.
- Block the drain opening with a washcloth or basket strainer so you don't drop tiny screws down the waste line.
- Lay out a towel on your countertop to systematically organize the small parts as you remove them.
- Keep a bucket and a sponge nearby to catch the residual water that will spill out when you remove the faucet cartridge or stem.
How to Handle Stubborn or Rusted Faucet Parts
Older faucets that have been in service for decades are often covered in rust and mineral build-up, making disassembly incredibly difficult. Trying to force a stuck nut can warp the underlying copper pipes.
"When dealing with calcified plumbing threads, patience and chemical penetration will always triumph over raw physical force. Never brute-force a metal nut that resists turning, as you risk cracking the underlying plumbing joints behind your wall."
If a packing nut or retaining clip refuses to budge, spray it generously with a penetrating oil like WD-40 or a specialized rust dissolver. Allow the chemicals to work for 15 to 20 minutes before attempting to twist again. If the handle itself is stuck to the cartridge stem, use a specialized handle puller tool to gently press it off without damaging the internal plumbing cartridge.
The Financial and Environmental Benefits of DIY Upkeep
Tackling minor plumbing repairs on your own keeps hard-earned money in your wallet. A professional plumber will charge a dispatch fee plus hourly labor rates, meaning a simple washer replacement can easily cost hundreds of dollars. On the other hand, a package of replacement washers and O-rings costs less than ten dollars at any home improvement store. Furthermore, stopping a continuous drip helps conserve precious fresh water, protecting local ecosystems and lowering your monthly utilities.
Knowing When Your DIY Kitchen Surgery Has Failed
Even with the best preparations, things do not always go as planned. If you turn the water supply back on and find that water is spraying from the handle, or if the faucet body itself has developed a crack from age and corrosion, it is time to reassess. If you realize the project is beyond your comfort zone or tools, knowing how to hire a reliable local plumber quickly will prevent minor water damage from turning into a major home disaster. Keep a list of emergency plumbing contacts handy, and never leave your main water supply open if you cannot control a steady leak.